Change Program that Opens a File

Sunday, August 2, 2009 · 0 komentar

If you have a file that can be opened with the existing application, but when click on that file can not be opened. To be able to open it, follow the trick below:
  1. Open Windows Explorer.
  2. Click on the file to be opened by a different program.
  3. On the File menu click Properties.
  4. On the General tab next to Opens with: click on the Change button.
  5. Click on the name of the program that is to open the file, or click Other to select a program that is not listed.
Notes :

This change affects all files that have the same file name extension as the file you selected. For example, if you change the program that opens a .jpg file, all .jpg files will open in this program.

You can also specify a different program by selecting a file that you changed, clicking the File menu, clicking Open With, and then clicking a program name, or clicking Other, and then selecting the name of the program.
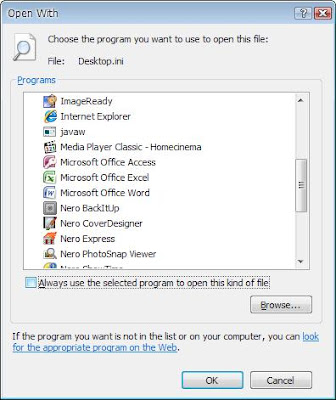
Open with picture

Hide Hidden Files with ACDSee 8

Saturday, August 1, 2009 · 0 komentar

Windows recognize two types of attributes to handle the file, that is show and hidden. Show option is used to display the file, hidden options will hide files.

This is different from ACDSee. This picture program manager, the attribute will not be, so if you have a file with hidden attribute, the file will still appear on ACDSee. So, hide the file with the "Do not show hidden files and folders" option in the Folder Options will not be useful in this program.

Therefore, the necessary tricks in order to keep your files secure hidden. As below:
  1. Run ACDSee
  2. After the ACDSee window opens, click the View-> Filters ..
  3. Remove the check in front of Show hidden files and folders.
  4. Click Ok to save the changes.

Send To Menu Modifications

Friday, July 31, 2009 · 0 komentar

Most people will use the Send To menu to send the data to the flash disk quickly. Unfortunately you can only send data to the root directory so that all the data you send will be mixed.

To overcome this, you can create folders on the flash disk as needed. Eg you create a Music folder to store your mp3 data. To make Send to menu display the folder options in your flash disk, follow the trick below:
  1. Create a folder on the flash disk according category (music, application, etc).
  2. Create a shortcut to each folder with the right click the folder and then create shortcut.
  3. Select all the shortcuts, right click-> Copy.
  4. Entry in the Folder Option. In the Windows Explorer menu click Tools-> Folder Options. Select the View tab and select Show hidden files and folders.
  5. Copy all the shortcut to C: \ Documents and Settings \ your_account \ SendTo.
Now, if you select the Send To menu, you will get a directory that refers to the folder that you created earlier.

Scandisk on Locked Drive

Thursday, July 30, 2009 · 0 komentar

When perform scandisk, sometimes appear warning that scandisk can not be performed on the selected drive. For that trick needs to be done as below:
  1. Open the Command Prompt (Run type cmd, press Enter)
  2. In the Command Prompt window, type chkdsk /X /F /R [drive_name]:
  3. Ex: If you want to do scandisk on drive E, then the command is written chkdsk /X /F /R E:
  4. Then press Enter, then the scandisk will run as usual.

Scandisk Picture

Change Screen Resolution Windows XP

Wednesday, July 29, 2009 · 0 komentar

Follow the tips below to change the sreen resolution on your monitor.
  1. Right click on Desktop, select Properties.
  2. In the Display Properties window, select the Settings tab.
  3. In the Screen Resolution section, move the slider to the right to higger resolution and slide to the left for lower resolution.
  4. Then click Apply.
  5. If there is confirmation, click OK.
Tip: To monitor CRT 15-inch select 800x600 and 17-inch select 1024x768, but you can choose according to your taste.

Note: A higher screen resolution reduces the size of items on a monitor screen and increases the size of the desktop. Monitor and display adapter determine whether the screen can be changed

Display Properties Picture

How to Change Screen Refresh Rate

Tuesday, July 28, 2009 · 0 komentar

If you are every day in front of the computer, the long run you will feel the eyes tired. LCD monitor user will be more comfortable than the CRT monitor user's.

If you use a CRT, you can try the following tips so that your eyes do not get tired quickly.
  1. Right-click on the Desktop, then select Properties.
  2. In the Display Properties window, select the Settings tab.
  3. Select the Advanced button, and then a new window will open.
  4. Select the Monitor tab. In the Monitor Settings, check the Hide Modes that this monitor can not display, then click Aplly.
  5. Now on the Screen refresh rate, select the largest value, and then click Apply.
  6. If there is confirmation, press OK.

Remote Shutdown Dialog

Monday, July 27, 2009 · 0 komentar

To turn off the computer itself, you can just access the Start-> Turn Off Computer. but how do you shutdown the computer through your computer? You can use the Remote Desktop, but there are others who altenatif more quickly, using the Remote Shutdown Dialog. To use it, follow these steps:
  1. Login as administrator.
  2. Log in to Command Prompt (Run type cmd and press enter)
  3. Type, shutdown -i and press enter. Remote Shutdown Dialog window will appear.
  4. Click the Add button to add the name or ip address the target computer.
  5. At the option What do you want to do these computer, select the suit you.
  6. Other options such as warn users of the action, and display warning for comment, select the suit you.
  7. If you have done click OK.


Remote Shutdown Dialog Picture

BackUp for NTFS User

Sunday, July 26, 2009 · 0 komentar

Users with NTFS are presented with a much more difficult problem. The NTFS file system is a secure file system that may not be easily accessed using other operating systems not compatible with NTFS, such as DOS or Windows 95/98/Me. Files on an NTFS drive may only be written by Windows XP and not by other operating systems.

Sure, some utilities allow NTFS to be accessed from Windows 95/98/Me. However, the mode of access is typically read-only; there is no chance of a restore that way. Some utilities or drivers do offer write access to NTFS file systems, however I don't recommend using them except as a last resort, because they may not be compatible with future versions of NTFS. To be able to access the registry files on an NTFS drive, you must install a second copy of Windows XP.

Windows XP supports multiple boot configurations quite effectively. To create a multiple boot installation of Windows XP, simply follow these steps:
  1. Ensure that you have sufficient space on your hard drive for a second copy of Windows XP. Your second copy of Windows XP only needs to be the basic operating system—only a minimal amount of hard disk space is required. Figure 200MB to 1GB of hard disk space for this backup installation, depending on how much additional software and features you install. (Some users want two virtually identical installations, though this type of installation may consume substantially more disk space than a minimal installation of Windows XP.)
  2. Using the Windows XP installation boot diskettes, begin your installation. When prompted for a destination, simply specify a new, different directory than the working installation of Windows XP. If you are farsighted enough, and are doing this before disaster has struck, you can install directly from the distribution CD without using the boot diskettes. To do so, run the Windows XP Setup program to begin the installation process. (You can also install directly from the distribution CD if the hardware supports a boot from the CD drive). Don't install to the same directory that your current working installation of Windows XP is installed into. That won't create a second copy of Windows XP.
  3. The Windows XP Setup program will configure the Boot Manager (creating new entries in the boot menu) so that you are able to choose which copy of Windows XP you want to boot.

Disable 8.3 Name Creation in NTFS

Friday, July 24, 2009 · 0 komentar

Files that use the 8.3 naming convention can degrade NTFS drive performance. Unless you have a good reason for keeping the 8.3 naming convention intact (such as if you’re using 16-bit programs), a performance gain can be achieved by disabling it. Follow steps below :
  1. Go to Registry Editor (Run then type regedit and press Enter).
  2. Find key HKEY_LOCAL_MACHINE\SYSTEM\CurrentControlSet\Control\FileSystem\
  3. On right panel choose NtfsDisable8dot3NameCreation, double click and change value to 1.
  4. Exit the Registry Editor and reboot.

Windows XP Prefetch Parameters Tips

Thursday, July 23, 2009 · 0 komentar

Prefetching (the reading of system boot files into a cache for faster loading) is a commonly overlooked component that can have a significant impact on system boot time. This tips allows you to select which components will make use of the prefetch parameters. To see which files are gathered using each setting, clear the prefetch cache located at C:\Windows\Prefetch and then enable one of the settings listed below. Clear the cache and repeat for each setting.
  1. Enter Registry Editor (Run then type regedit then hit Enter button).
  2. Go to HKEY_LOCAL_MACHINE\SYSTEM\CurrentControlSet\Control\SessionManager\Memory Management\PrefetchParameters
  3. On right panel, choose EnablePrefetcher to 0 to disable prefetching, 1 to prefetch application launch files, 2 to prefetch boot files, or 3 to prefetch as many files as possible.
  4. Close Registry Editor window and restart your computer.

PrefetchParameters Picture

Place Windows Kernel Into Memory

Wednesday, July 22, 2009 · 0 komentar

It’s a given that anything that runs in memory will be faster than an item that has to access the hard drive and virtual memory. Rather than have the kernel that is the foundation of XP using the slower Paging Executive functions, perform this tweaks only if the system has 256MB or more of memory. To do that, follow this trick below :

  1. Go to Registry Editor (Run then type regedit and press Enter button).
  2. Go to HKEY_LOCAL_MACHINE\SYSTEM\CurrentControlSet\Control\Session Manager\Memory Management\
  3. On right panel, find DisablePagingExecutive. Double click and set the value to 1 (default value is 0).
  4. Exit the Registry Editor and reboot computer.

DisablePagingExecutive Picture

How to Speed Start Menu

Tuesday, July 21, 2009 · 0 komentar

When we will open the program, we are going to the Start-> All Programs. When you position the mouse cursor is located on the All Programs, the list of programs that are not directly visible because of a pause time. Maybe for you it is normal, but this can be accelerate with change registry settings. To change the speed of the start menu, follow the tips below:
  1. Open Registy Editor (Run-> type regedit then enter)
  2. Go to HKEY_CURRENT_USER \ Control Panel \ Desktop \
  3. On the right panel, select MenuShowDelay. Default value is 400. You can change this value according to your desire, the smaller the more quickly.
  4. Close window Registy Editor and restart Windows

Registry Editor Picture

Windows Keyboard Shortcut

Monday, July 20, 2009 · 0 komentar

Here some windows keyboard shortcut in general that used daily, that make easy and faster to operate your windows :

• Alt + PrintScreen = Take a picture of your active window
• Alt + tab = Cycle between open applications
• Ctrl + Alt + Del = Open task manager to end task or restart
• Ctrl + tab = Cycle between open tabs in your browser
• Ctrl + Click = Select multiple non-contiguous files, folders, text entries
• Ctrl + C = Copy files
• Ctrl + X = Cut files
• Ctrl + V = Paste files
• Ctrl + A = Select All
• Ctrl + Z = Undo last action
• Ctrl + F = Find / Search
• Ctrl + Esc = Open the Start Menu
• Ctrl + Home = Go to the beginning of a document
• Ctrl + End = Go to the end of a document
• Ctrl + F6 = Cycle between open Office documents
• Ctrl + P = Send almost anything to the printer
• F5 = Refresh your screen / refresh web page
• PrintScreen = Take a picture of your window
• Windows Key + L = Fast user switching logon screen
• Windows Key + U = Utility Manager (Narrator, Magnifier, on-screen keyboard.)
• Windows Key + R = Run command
• Windows Key + F = Search for Files dialog
• Windows Key + E = Explorer
• Windows Key + D = Toggle Desktop / Windows view
• Windows Key + M = Minimize all Windows

Windows XP Tips - Troubleshoot Error Logs

Sunday, July 19, 2009 · 0 komentar

Using the event logs in Event Viewer, you can gather information about hardware, software, and system problems. You can also monitor Windows XP security events. To view a complete list of all problems on your computer, open Control Panel - Administrative Tools ? Event Viewer.

There will be at least three logs filed there.
  • The application log contains events logged by applications or programs. For example, a database program might record a file error in the application log.
  • The security log records events such as valid and invalid logon attempts, as well as events related to resource use such as creating, opening, or deleting files or other objects.
  • The system log contains events logged by Windows XP system components. For example, the failure of a driver or other system component to load during startup is recorded in the system log.
Double-click on the log entry for more information. Keep track of the Event ID number and use EventID.net to see if there are any possible solutions to the problem.

Troubleshoot Error Logs Picture

Windows XP Tips - Upgrade Your Windows To Service Pack 3

Saturday, July 18, 2009 · 0 komentar

In Microsoft Windows XP Service Pack 3, Microsoft is introducing a set of security technologies that will help to improve the ability of Windows XP-based computers to withstand malicious attacks from viruses and worms.

The technologies include network protection, memory protection, safer e-mail handling, more secure browsing, and improved computer maintenance. To check which version of Windows XP you are running, click “start” then “Run”. Type “winver” and click OK. If you are not on Microsoft Windows XP Service Pack 3, go to http://www.microsoft.com/downloads/en/default.aspx to download Service Pack 3 (It’s free, and will patch up a handful of security problems with Windows XP) Changes with XP:
  1. The new Security Center is a dashboard for the security-related tools on your system.
  2. The new Windows Firewall is on by default, more discoverable, and more configurable.
  3. Add/Remove Programs now hides system updates by default.
  4. IE's pop-up ad blocking feature is unobtrusive and easy-to-use.
  5. Bluetooth support is finally more integrated into the OS.
  6. Automatic Updates advertises itself the first time you reboot the computer.

Windows XP SP3 Picture

Windows XP Tips - Change Virtual Memory Amount

Friday, July 17, 2009 · 0 komentar

Computer maintenance should be perform, one of them is virtual memory management. Virtual Memory is temporary storage used by a computer to run programs that need more memory than it has. For example, programs could have access to 4GB of virtual memory on a computer's hard drive, even if the computer has only 32MBof RAM. The program data that does not currently fit in the computer's memory is saved into paging files. To change the size of the virtual memory paging file, you must be logged on as an administrator or a member of the Administrators group.
  1. Open System in Control Panel.
  2. On the Advanced tab, under Performance, click Settings.
  3. On the Advanced tab, under Virtual memory, click Change.
  4. Under Drive [Volume Label], click the drive that contains the paging file you want to change.
  5. Under Paging file size for selected drive, click Custom size, and type a new paging file size in megabytes in the Initial size (MB) or Maximum size (MB) box, and then click Set.
  6. If you decrease the size of either the initial or maximum page file settings, you must restart your computer to see the effects of those changes. Increases typically do not require a restart.

Notes
  • For best performance, do not set the initial size to less than the minimum recommended size under Total paging file size for all drives. The recommended size is equivalent to 1.5 times the amount of RAM on your system. Usually, you should leave the paging file at its recommended size, although you might increase its size if you routinely use programs that require a lot of memory.
  • To delete a paging file, set both initial size and maximum size to zero, or click No paging file. Microsoft strongly recommends that you do not disable or delete the paging file.

Virtual Memory Default Settings:
  • For 128 MB RAM: Minimum: 192 Maximum: 384
  • For 256 MB RAM: Minimum: 384 Maximum: 1152

Windows XP Tips - Remove Visual Effect

Thursday, July 16, 2009 · 0 komentar

Windows XP has a variety of visual effects is quite good, but if all of the effect is activated, it is not directly to your computer will follow later, although not too feels. Just use effect for necessary and appropriate to the needs so, you will not spend too much memory space. Impact, of course, your computer will be slightly more quick and responsive. To activate or turn off the visual effects on windows Xp, follow the tips below:
  1. Right-click on the MyComputer icon and select Properties.
  2. Select the Advance tab. In the Performance box, select Settings.
  3. Performance Options window will open. Here you can see all the effects are offered on windows xp. To enable, check the items and uncheck to disable the item.
  4. Click Ok to apply changes.

 Remove Visual Effect Picture

Windows XP Tips - Disable System Restore

Wednesday, July 15, 2009 · 0 komentar

Do you know that you can reduce the memory system so that you can work a little faster?
Much can be done to reduce the burden of memory, among others, to disable the service windows that were not so necessary. One service that can be turned off is the System Restore Services. If you want to disable System Restore, follow the trick below:

  1. Go to Start-> Run and type services.msc then Enter.
  2. Services window will open, find the System Restore Service.
  3. Double Click on System Restore Service.
  4. In the Startup Type select Disable and the service status click on Stop button.
  5. Close the window Service and Restart your PC.

Windows Vista Tips - Change Desktop Background

Tuesday, July 14, 2009 · 0 komentar

At the time this tutorial will explain on how to change desktop background on windows vista, because I used different ways to change wallpaper in xp. For advanced users, this may not be a problem, but for the new windows vista user, hopefully these tips can be useful. To perform the replacement of background Vista, follow steps below:
  1. Right click on your desktop
  2. In the drop-down menu that appears, select Personalize.
  3. In the new window that opens, select the Browse button to select the image that will be used as your desktop background. If you do not have pictures, windows vista background already provides the option for you, you only choose one only.
  4. Select the position of your image as you wish. Click OK.
Now you have the appropriate desktop background of your choice.

Windows Vista Tips - Setup Flip 3D Speed

Monday, July 13, 2009 · 0 komentar

Windows Vista allows you to make modifications to various elements within it. Of which set the speed is Flip 3D, while the following tips:
  1. Go to the Registry Editor (Run-> type regedit and press Enter)
  2. Go to HKEY_CURRENT_USER \ software \ Microsoft \ Windows \ Dwm
  3. On the right side of the window, right click and select New-> DWORD Value. Name it with Animations.
  4. Double click Animations and give value 1.
  5. Create a new DWORD Value with the name AnimationsShiftKey and give the value 1.
  6. To feel the changes, close the registry editor and restart your windows.

Windows Vista Flip 3D Picture

Followers

Site Sponsors

Add to Technorati Favorites
Click Here to Advertise On My Blog