Change Program that Opens a File

Sunday, August 2, 2009 · 0 komentar

If you have a file that can be opened with the existing application, but when click on that file can not be opened. To be able to open it, follow the trick below:
  1. Open Windows Explorer.
  2. Click on the file to be opened by a different program.
  3. On the File menu click Properties.
  4. On the General tab next to Opens with: click on the Change button.
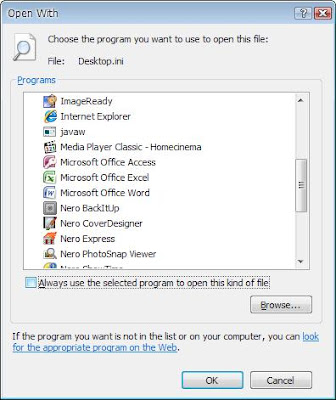
  5. Click on the name of the program that is to open the file, or click Other to select a program that is not listed.
Notes :

This change affects all files that have the same file name extension as the file you selected. For example, if you change the program that opens a .jpg file, all .jpg files will open in this program.

You can also specify a different program by selecting a file that you changed, clicking the File menu, clicking Open With, and then clicking a program name, or clicking Other, and then selecting the name of the program.

Open with picture

Hide Hidden Files with ACDSee 8

Saturday, August 1, 2009 · 0 komentar

Windows recognize two types of attributes to handle the file, that is show and hidden. Show option is used to display the file, hidden options will hide files.

This is different from ACDSee. This picture program manager, the attribute will not be, so if you have a file with hidden attribute, the file will still appear on ACDSee. So, hide the file with the "Do not show hidden files and folders" option in the Folder Options will not be useful in this program.

Therefore, the necessary tricks in order to keep your files secure hidden. As below:
  1. Run ACDSee
  2. After the ACDSee window opens, click the View-> Filters ..
  3. Remove the check in front of Show hidden files and folders.
  4. Click Ok to save the changes.

Send To Menu Modifications

Friday, July 31, 2009 · 0 komentar

Most people will use the Send To menu to send the data to the flash disk quickly. Unfortunately you can only send data to the root directory so that all the data you send will be mixed.

To overcome this, you can create folders on the flash disk as needed. Eg you create a Music folder to store your mp3 data. To make Send to menu display the folder options in your flash disk, follow the trick below:
  1. Create a folder on the flash disk according category (music, application, etc).
  2. Create a shortcut to each folder with the right click the folder and then create shortcut.
  3. Select all the shortcuts, right click-> Copy.
  4. Entry in the Folder Option. In the Windows Explorer menu click Tools-> Folder Options. Select the View tab and select Show hidden files and folders.
  5. Copy all the shortcut to C: \ Documents and Settings \ your_account \ SendTo.
Now, if you select the Send To menu, you will get a directory that refers to the folder that you created earlier.

Scandisk on Locked Drive

Thursday, July 30, 2009 · 0 komentar

When perform scandisk, sometimes appear warning that scandisk can not be performed on the selected drive. For that trick needs to be done as below:
  1. Open the Command Prompt (Run type cmd, press Enter)
  2. In the Command Prompt window, type chkdsk /X /F /R [drive_name]:
  3. Ex: If you want to do scandisk on drive E, then the command is written chkdsk /X /F /R E:
  4. Then press Enter, then the scandisk will run as usual.

Scandisk Picture

Change Screen Resolution Windows XP

Wednesday, July 29, 2009 · 0 komentar

Follow the tips below to change the sreen resolution on your monitor.
  1. Right click on Desktop, select Properties.
  2. In the Display Properties window, select the Settings tab.
  3. In the Screen Resolution section, move the slider to the right to higger resolution and slide to the left for lower resolution.
  4. Then click Apply.
  5. If there is confirmation, click OK.
Tip: To monitor CRT 15-inch select 800x600 and 17-inch select 1024x768, but you can choose according to your taste.

Note: A higher screen resolution reduces the size of items on a monitor screen and increases the size of the desktop. Monitor and display adapter determine whether the screen can be changed

Display Properties Picture

How to Change Screen Refresh Rate

Tuesday, July 28, 2009 · 0 komentar

If you are every day in front of the computer, the long run you will feel the eyes tired. LCD monitor user will be more comfortable than the CRT monitor user's.

If you use a CRT, you can try the following tips so that your eyes do not get tired quickly.
  1. Right-click on the Desktop, then select Properties.
  2. In the Display Properties window, select the Settings tab.
  3. Select the Advanced button, and then a new window will open.
  4. Select the Monitor tab. In the Monitor Settings, check the Hide Modes that this monitor can not display, then click Aplly.
  5. Now on the Screen refresh rate, select the largest value, and then click Apply.
  6. If there is confirmation, press OK.

Remote Shutdown Dialog

Monday, July 27, 2009 · 0 komentar

To turn off the computer itself, you can just access the Start-> Turn Off Computer. but how do you shutdown the computer through your computer? You can use the Remote Desktop, but there are others who altenatif more quickly, using the Remote Shutdown Dialog. To use it, follow these steps:
  1. Login as administrator.
  2. Log in to Command Prompt (Run type cmd and press enter)
  3. Type, shutdown -i and press enter. Remote Shutdown Dialog window will appear.
  4. Click the Add button to add the name or ip address the target computer.
  5. At the option What do you want to do these computer, select the suit you.
  6. Other options such as warn users of the action, and display warning for comment, select the suit you.
  7. If you have done click OK.


Remote Shutdown Dialog Picture

BackUp for NTFS User

Sunday, July 26, 2009 · 0 komentar

Users with NTFS are presented with a much more difficult problem. The NTFS file system is a secure file system that may not be easily accessed using other operating systems not compatible with NTFS, such as DOS or Windows 95/98/Me. Files on an NTFS drive may only be written by Windows XP and not by other operating systems.

Sure, some utilities allow NTFS to be accessed from Windows 95/98/Me. However, the mode of access is typically read-only; there is no chance of a restore that way. Some utilities or drivers do offer write access to NTFS file systems, however I don't recommend using them except as a last resort, because they may not be compatible with future versions of NTFS. To be able to access the registry files on an NTFS drive, you must install a second copy of Windows XP.

Windows XP supports multiple boot configurations quite effectively. To create a multiple boot installation of Windows XP, simply follow these steps:
  1. Ensure that you have sufficient space on your hard drive for a second copy of Windows XP. Your second copy of Windows XP only needs to be the basic operating system—only a minimal amount of hard disk space is required. Figure 200MB to 1GB of hard disk space for this backup installation, depending on how much additional software and features you install. (Some users want two virtually identical installations, though this type of installation may consume substantially more disk space than a minimal installation of Windows XP.)
  2. Using the Windows XP installation boot diskettes, begin your installation. When prompted for a destination, simply specify a new, different directory than the working installation of Windows XP. If you are farsighted enough, and are doing this before disaster has struck, you can install directly from the distribution CD without using the boot diskettes. To do so, run the Windows XP Setup program to begin the installation process. (You can also install directly from the distribution CD if the hardware supports a boot from the CD drive). Don't install to the same directory that your current working installation of Windows XP is installed into. That won't create a second copy of Windows XP.
  3. The Windows XP Setup program will configure the Boot Manager (creating new entries in the boot menu) so that you are able to choose which copy of Windows XP you want to boot.

Disable 8.3 Name Creation in NTFS

Friday, July 24, 2009 · 0 komentar

Files that use the 8.3 naming convention can degrade NTFS drive performance. Unless you have a good reason for keeping the 8.3 naming convention intact (such as if you’re using 16-bit programs), a performance gain can be achieved by disabling it. Follow steps below :
  1. Go to Registry Editor (Run then type regedit and press Enter).
  2. Find key HKEY_LOCAL_MACHINE\SYSTEM\CurrentControlSet\Control\FileSystem\
  3. On right panel choose NtfsDisable8dot3NameCreation, double click and change value to 1.
  4. Exit the Registry Editor and reboot.

Windows XP Prefetch Parameters Tips

Thursday, July 23, 2009 · 0 komentar

Prefetching (the reading of system boot files into a cache for faster loading) is a commonly overlooked component that can have a significant impact on system boot time. This tips allows you to select which components will make use of the prefetch parameters. To see which files are gathered using each setting, clear the prefetch cache located at C:\Windows\Prefetch and then enable one of the settings listed below. Clear the cache and repeat for each setting.
  1. Enter Registry Editor (Run then type regedit then hit Enter button).
  2. Go to HKEY_LOCAL_MACHINE\SYSTEM\CurrentControlSet\Control\SessionManager\Memory Management\PrefetchParameters
  3. On right panel, choose EnablePrefetcher to 0 to disable prefetching, 1 to prefetch application launch files, 2 to prefetch boot files, or 3 to prefetch as many files as possible.
  4. Close Registry Editor window and restart your computer.

PrefetchParameters Picture

Place Windows Kernel Into Memory

Wednesday, July 22, 2009 · 0 komentar

It’s a given that anything that runs in memory will be faster than an item that has to access the hard drive and virtual memory. Rather than have the kernel that is the foundation of XP using the slower Paging Executive functions, perform this tweaks only if the system has 256MB or more of memory. To do that, follow this trick below :

  1. Go to Registry Editor (Run then type regedit and press Enter button).
  2. Go to HKEY_LOCAL_MACHINE\SYSTEM\CurrentControlSet\Control\Session Manager\Memory Management\
  3. On right panel, find DisablePagingExecutive. Double click and set the value to 1 (default value is 0).
  4. Exit the Registry Editor and reboot computer.

DisablePagingExecutive Picture

How to Speed Start Menu

Tuesday, July 21, 2009 · 0 komentar

When we will open the program, we are going to the Start-> All Programs. When you position the mouse cursor is located on the All Programs, the list of programs that are not directly visible because of a pause time. Maybe for you it is normal, but this can be accelerate with change registry settings. To change the speed of the start menu, follow the tips below:
  1. Open Registy Editor (Run-> type regedit then enter)
  2. Go to HKEY_CURRENT_USER \ Control Panel \ Desktop \
  3. On the right panel, select MenuShowDelay. Default value is 400. You can change this value according to your desire, the smaller the more quickly.
  4. Close window Registy Editor and restart Windows

Registry Editor Picture

Windows Keyboard Shortcut

Monday, July 20, 2009 · 0 komentar

Here some windows keyboard shortcut in general that used daily, that make easy and faster to operate your windows :

• Alt + PrintScreen = Take a picture of your active window
• Alt + tab = Cycle between open applications
• Ctrl + Alt + Del = Open task manager to end task or restart
• Ctrl + tab = Cycle between open tabs in your browser
• Ctrl + Click = Select multiple non-contiguous files, folders, text entries
• Ctrl + C = Copy files
• Ctrl + X = Cut files
• Ctrl + V = Paste files
• Ctrl + A = Select All
• Ctrl + Z = Undo last action
• Ctrl + F = Find / Search
• Ctrl + Esc = Open the Start Menu
• Ctrl + Home = Go to the beginning of a document
• Ctrl + End = Go to the end of a document
• Ctrl + F6 = Cycle between open Office documents
• Ctrl + P = Send almost anything to the printer
• F5 = Refresh your screen / refresh web page
• PrintScreen = Take a picture of your window
• Windows Key + L = Fast user switching logon screen
• Windows Key + U = Utility Manager (Narrator, Magnifier, on-screen keyboard.)
• Windows Key + R = Run command
• Windows Key + F = Search for Files dialog
• Windows Key + E = Explorer
• Windows Key + D = Toggle Desktop / Windows view
• Windows Key + M = Minimize all Windows

Windows XP Tips - Troubleshoot Error Logs

Sunday, July 19, 2009 · 0 komentar

Using the event logs in Event Viewer, you can gather information about hardware, software, and system problems. You can also monitor Windows XP security events. To view a complete list of all problems on your computer, open Control Panel - Administrative Tools ? Event Viewer.

There will be at least three logs filed there.
  • The application log contains events logged by applications or programs. For example, a database program might record a file error in the application log.
  • The security log records events such as valid and invalid logon attempts, as well as events related to resource use such as creating, opening, or deleting files or other objects.
  • The system log contains events logged by Windows XP system components. For example, the failure of a driver or other system component to load during startup is recorded in the system log.
Double-click on the log entry for more information. Keep track of the Event ID number and use EventID.net to see if there are any possible solutions to the problem.

Troubleshoot Error Logs Picture

Windows XP Tips - Upgrade Your Windows To Service Pack 3

Saturday, July 18, 2009 · 0 komentar

In Microsoft Windows XP Service Pack 3, Microsoft is introducing a set of security technologies that will help to improve the ability of Windows XP-based computers to withstand malicious attacks from viruses and worms.

The technologies include network protection, memory protection, safer e-mail handling, more secure browsing, and improved computer maintenance. To check which version of Windows XP you are running, click “start” then “Run”. Type “winver” and click OK. If you are not on Microsoft Windows XP Service Pack 3, go to http://www.microsoft.com/downloads/en/default.aspx to download Service Pack 3 (It’s free, and will patch up a handful of security problems with Windows XP) Changes with XP:
  1. The new Security Center is a dashboard for the security-related tools on your system.
  2. The new Windows Firewall is on by default, more discoverable, and more configurable.
  3. Add/Remove Programs now hides system updates by default.
  4. IE's pop-up ad blocking feature is unobtrusive and easy-to-use.
  5. Bluetooth support is finally more integrated into the OS.
  6. Automatic Updates advertises itself the first time you reboot the computer.

Windows XP SP3 Picture

Windows XP Tips - Change Virtual Memory Amount

Friday, July 17, 2009 · 0 komentar

Computer maintenance should be perform, one of them is virtual memory management. Virtual Memory is temporary storage used by a computer to run programs that need more memory than it has. For example, programs could have access to 4GB of virtual memory on a computer's hard drive, even if the computer has only 32MBof RAM. The program data that does not currently fit in the computer's memory is saved into paging files. To change the size of the virtual memory paging file, you must be logged on as an administrator or a member of the Administrators group.
  1. Open System in Control Panel.
  2. On the Advanced tab, under Performance, click Settings.
  3. On the Advanced tab, under Virtual memory, click Change.
  4. Under Drive [Volume Label], click the drive that contains the paging file you want to change.
  5. Under Paging file size for selected drive, click Custom size, and type a new paging file size in megabytes in the Initial size (MB) or Maximum size (MB) box, and then click Set.
  6. If you decrease the size of either the initial or maximum page file settings, you must restart your computer to see the effects of those changes. Increases typically do not require a restart.

Notes
  • For best performance, do not set the initial size to less than the minimum recommended size under Total paging file size for all drives. The recommended size is equivalent to 1.5 times the amount of RAM on your system. Usually, you should leave the paging file at its recommended size, although you might increase its size if you routinely use programs that require a lot of memory.
  • To delete a paging file, set both initial size and maximum size to zero, or click No paging file. Microsoft strongly recommends that you do not disable or delete the paging file.

Virtual Memory Default Settings:
  • For 128 MB RAM: Minimum: 192 Maximum: 384
  • For 256 MB RAM: Minimum: 384 Maximum: 1152

Windows XP Tips - Remove Visual Effect

Thursday, July 16, 2009 · 0 komentar

Windows XP has a variety of visual effects is quite good, but if all of the effect is activated, it is not directly to your computer will follow later, although not too feels. Just use effect for necessary and appropriate to the needs so, you will not spend too much memory space. Impact, of course, your computer will be slightly more quick and responsive. To activate or turn off the visual effects on windows Xp, follow the tips below:
  1. Right-click on the MyComputer icon and select Properties.
  2. Select the Advance tab. In the Performance box, select Settings.
  3. Performance Options window will open. Here you can see all the effects are offered on windows xp. To enable, check the items and uncheck to disable the item.
  4. Click Ok to apply changes.

 Remove Visual Effect Picture

Windows XP Tips - Disable System Restore

Wednesday, July 15, 2009 · 0 komentar

Do you know that you can reduce the memory system so that you can work a little faster?
Much can be done to reduce the burden of memory, among others, to disable the service windows that were not so necessary. One service that can be turned off is the System Restore Services. If you want to disable System Restore, follow the trick below:

  1. Go to Start-> Run and type services.msc then Enter.
  2. Services window will open, find the System Restore Service.
  3. Double Click on System Restore Service.
  4. In the Startup Type select Disable and the service status click on Stop button.
  5. Close the window Service and Restart your PC.

Windows Vista Tips - Change Desktop Background

Tuesday, July 14, 2009 · 0 komentar

At the time this tutorial will explain on how to change desktop background on windows vista, because I used different ways to change wallpaper in xp. For advanced users, this may not be a problem, but for the new windows vista user, hopefully these tips can be useful. To perform the replacement of background Vista, follow steps below:
  1. Right click on your desktop
  2. In the drop-down menu that appears, select Personalize.
  3. In the new window that opens, select the Browse button to select the image that will be used as your desktop background. If you do not have pictures, windows vista background already provides the option for you, you only choose one only.
  4. Select the position of your image as you wish. Click OK.
Now you have the appropriate desktop background of your choice.

Windows Vista Tips - Setup Flip 3D Speed

Monday, July 13, 2009 · 0 komentar

Windows Vista allows you to make modifications to various elements within it. Of which set the speed is Flip 3D, while the following tips:
  1. Go to the Registry Editor (Run-> type regedit and press Enter)
  2. Go to HKEY_CURRENT_USER \ software \ Microsoft \ Windows \ Dwm
  3. On the right side of the window, right click and select New-> DWORD Value. Name it with Animations.
  4. Double click Animations and give value 1.
  5. Create a new DWORD Value with the name AnimationsShiftKey and give the value 1.
  6. To feel the changes, close the registry editor and restart your windows.

Windows Vista Flip 3D Picture

Windows Vista Tips - Add Vista Blur Effect

Sunday, July 12, 2009 · 0 komentar

Windows Vista Aero effects give a transparent effect on the various objects that are in the back. In addition, the effect of transparency can still be modified to give effect to the opaque transparent window on the Aero, the following tricks:
  • Run Notepad.
  • Type the code:
Windows Registry Editor Version 5:00

[HKEY_LOCAL_MACHINE \ SOFTWARE \ Microsoft \ Dwm]
"Blur" = dword: 00000001
  • Save with the name Blur.reg
  • Double click on the Blur.reg file, then click Yes on the confirmation window that appears.

To restore the original, such as Aero effects, change

"Blur" = dword: 00000001

to be

"Blur" = dword: 00000000

Windows Vista Tips - Vista Explorer Optimization

Saturday, July 11, 2009 · 0 komentar

Windows Explorer display on Windows Vista has many differences compared to earlier versions of windows. This, of course, will throw for the nonexpert user. Therefore, in order to more easily interact with the new Windows Explorer, follow the tips below:
  • Open the windows Explorer (Right-click on the windows logo and then select Explore).
  • In the toolbar menu select Tools-> Folder Options.
  • Eliminate uncheck the following options:
  1. Automatically search for network folders and printers.
  2. Display file size information in folder tips.
  3. Display simple folder view in Explorer's Folder list.
  4. Hide extensions for know files and folders.
  5. Hide protectd operating system files (Recommended).
  6. Use Domain Folder Sharing Wizard.
  • Give a check on the following:
  1. Select show hidden files and folders.
  2. Launch folder windows in a separate process.
  3. Save changes by clicking OK.

Windows Vista Tips - Use Alternate Button

Friday, July 10, 2009 · 0 komentar

The Minimize, maximize and close buttons on windows XP and vista are different. On windows XP, the third button is square-shaped, but in windows vista has turned into rectangle. on windows vista, the third key before the key can be replaced with alternatives that are similar to windows xp, is to follow the trick below:
  1. Go to the Start-> run. Type regedit in the Run window.
  2. Go to HKEY_LOCAL_MACHINE \ SOFTWARE \ Microsoft \ Dwm.
  3. On the right side of the window, right click select New-> DWORD Value.
  4. UseAlternateButtons with its name and contents with the value 1.
  5. To see the difference, close the Registry Editor and Restart your computer.

Windows Vista Tips - Vista Without Window Control

Thursday, July 9, 2009 · 0 komentar

Each of the active window has a Minimize , Maximize and Close button. The three buttons are used to set the position and size of the active window. Sometimes we want so that the window is not disturbed other people, for that you need to hide the third button from the view, follow the tips below:
  1. Go to the Registry Editor (Run then type regedit).
  2. Go to the HKEY_LOCAL_MACHINE \ Software \ Microsoft.
  3. In the blank area on the right side, right click and select New-> Key. Name it with Dwm.
  4. Under Dwm key, create a new DWORD value with the name RenderClientAreaOnly and give the value 1.
  5. Close the Registry Editor window and restart the computer.

Windows Vista Tips - Turn Off Aero Effect

· 0 komentar

Not all applications support aero effect, there are some applications that do not support the aero can crash when the application is started. One way to overcome it is to find applications that are compatible with vista. Another way that can be done with turn off the aero features.

But the steps to switch from Vista Aero to Vista Basic was bearable length. If this will continue to be very tiring. For that, try the following tricks to turn off Aero features with one click.
  • Run Notepad.
  • Type the script below:
Windows Registry Editor Version 5:00

[HKEY_LOCAL_MACHINE \ SOFTWARE \ Microsoft \ Dwm]
"Glass" = dword: 00000000
  • Save with the name aero.reg
  • To turn off aero, double click on aero.reg.
To restore the aero effect, modified the script above in the "Glass" = dword: 00000000, instead of "Glass" = dword: 00000001.

Tips to Optimize USB Flash Disk with NTFS Format

Wednesday, July 8, 2009 · 0 komentar

If you are interested in that USB flash disk can work more optimally, the following steps to format your flash drive into NTFS partition.
  1. Log in as Administrator.
  2. Plug USB flash disk into computer. If you want to re-format, backup data in your flash drive first.
  3. Right-click MyComputer icon and select Properties, then select the Hardware tab and select Device Manager.
  4. Click on the Disk Drive, you will see that the USB flash disk you already have listings on the drive.
  5. Right click on your USB flash disk and select Properties. Select the Policies tab. There will be two options, Optimize for Quick Removal and Optimize for Peformance. Select the Optimize for Peformance.
  6. Sign in to Windows Explorer, right-click your USB flash disk and select Format.
  7. You will see that the NFTS file system can be selected. The allocation of 512 bytes can be used.

If your USB flash disk can not be formatted using NTFS, it is possible that your USB flash disk does not support NTFS.

Tips to Optimize USB Flash Disk with NTFS Format

Windows Vista Tips - Setup Applications Volume

· 0 komentar

During this time, when the MP3 plays on computer, the sound will not play as well as if the portable device, such as the iPod. This is because the MP3 sound disturbed by the sound produced by another system. Fortunately now for users of Windows Vista, because it has added new features sound management. With this feature, users can select and control the volume per application. Sound management for a better try the following tricks:
  1. Click Start-> Control Panel-> Hardware and Sound-> Audio Devices and Sound Themes.
  2. From this window, specify the device input and output sound will be activated.
  3. Click Properties to set the sound configuration, level and other options that device.
  4. To determine the sound of the system, right-click the Notification Area icons taskbar, and then click System Sound Events ...
  5. Activate, change or delete the voice that was issued by the system.
  6. Open Volume Control option allows the entire volume of applications that are currently open and sound resource use. Simply identify the icons of the applications that are currently active. Then move the slider of each of the icons of the application to set the volume. On the left side, there is Main Volume. The part which will control the overall volume that is under the application menu.

Windows Vista - Tips to Setup Applications Volume

Windows Vista Tips - Disable Useless Service

· 0 komentar

Similar to the previous generation of Windows NT-based, windows vista provide lots of services that can be managed by the user easily through the Administrative Tools. Who make between different generations is a new service provided by the windows. Of course not all new services will have many uses. For that it's good the service is disabled, is as follows:
  1. Click Start-> Run, type service.msc
  2. Service window will open, with a list of services that are on the windows. To disable a service, double-click the name of service and click Stop and the Startup Type select Manual.
Service that can be turned off:
  • IIS Admin Service
  • Offline files
  • Simple Mail Transfer Protocol (SMTP)
  • Tablet PC Input Service
For Tablet PC Input Service, can be turned off if you do not use the Tablet PC. When finished, restart your PC and feel the changes.

Windows Vista - Disable Useless Service

Windows Vista Tips - Disable Aero Animation

· 0 komentar

Windows Aero rich variety of effects and animation. One effect is the effect of the glass. With this feature, a window appears on the screen appear as if made of transparent glass, reflect the image that is in the back. To enhance the effect, some include animation effects such as flip, flip 3D or minimize the active window. Of course, these effects take more system resources. For that, try this trick at the bottom to turn off Aero animation.
  • Open Notepad.
  • Type:
Windows Registry Editor Version 5.00
[HKEY_LOCAL_MACHINE \ SOFTWARE \ Microsoft \ DWM]
"Animations" = dword: 00000000
  • Save with the name animation.reg.
  • Run animation.reg with double click on the file to integrated with the registry system.
To restore the animated Aero, replace "Animations" = dword: 00000000 with the "Animations" = dword: 00000001

Windows Vista Tips - Disable Aero Animation

Windows Vista Tips - Aero on the All-Hardware

· 0 komentar

Windows Vista asks for the "heavy" hardware to be able activate the Aero features, you need at least a graphics card with DirectX 9 support with 128Mb memory. In order for a maximum quality of Aero, Microsoft validate the device installed on your PC. When you pass the examination device, Aero will run smoothly. But if it does not pass inspection, Aero will not work. While not all devices are blocked windows vista does not support vista. May be, graphics card capable of running aero although not listed in the manifest that the device is supported vista. To ensure this, try to turn off the standard validation vista. Who knew that graphics card is now used, including luck, can run the aero feature although it is not registered. To follow the steps below bi:
  1. Go to the Registry Editor (Run-> regedit).
  2. Go to the HKEY_LOCAL_MACHINE \ SOFTWARE \ Microsoft \ Dwm.
  3. Click the Edit menu-> New-> DWORD Value, and name the EnableMachineCheck.
  4. Double Click EnableMachineCheck and content with value 1.
  5. Close the Registry Editor and restart the PC to see the changes.

 Windows Vista - Aero on the All-Hardware

Resize Vista Icon

Tuesday, July 7, 2009 · 0 komentar

Vista icon has big size, of course this will be easier for us to find an application icon. But if you do not like the large size and would look like windows XP icon, simply Right click any empty area of your Desktop and left click the word View, then the words Classic Icons.

Resize Vista Icon
While for the icon on the Start Menu, right click the Start button and choose Properties. Under the Start Menu tab, click the Customize button. Scroll all the way to the bottom and make sure there is not a check next to the words Use large icons.

Make Fonts More Viewable

· 0 komentar

What you feel that the font that is displayed under the windows so clear, for the use of old such as typing, this will be exhausting. But actually have windows font settings that can be arranged. To be more comfortable in reading the text, follow the steps below:
  1. Right-click on the desktop and select Properties.
  2. In the Display Properties window, select the Appearance tab.
  3. Click the Effects button.
  4. Check the option Use the following method to smooth edges of screen fonts, and in the dropdown menu, select Clear Type. By default windows sets this option in the Standard option.
  5. Click OK on the effects window and OK on the Display Properties window.
Font should now appear to be more clear and easier to read.

Make Fonts More Viewable

Windows Vista Tips - Managing Partitions Using Vista Disk Manager

· 0 komentar

To manage more than one partition, the software required 3rd party such as Partition Magic. Fortunately for those who already have windows vista as their operating system. After installing windows, no need to explore the application manager partition with the label "Certified for Windows Vista." Because Windows Vista already have their own partition management tool that is integrated called Vista Disk Manager. To use this feature, follow the steps below:
  1. Click Start-> Control Panel-> Computer Management.
  2. After the Computer Management console window opens, click the Disk Management which is located on the Storage panel on the left of the screen.
  3. To change the size of hard disk partition, right-click on the partition and select shrink volume in the context menu that appears.
  4. In the dialog box shrink, you are prompted to enter a new partition size in MB. Through this dialog box also tells you the size of the partition that will be modified.
  5. If you've determined the size of the partition, click the shrink button.
  6. To increase the size of the hard disk, right-click on the partition, and then select the Extended Volume on the context menu.
  7. Extended Volume window will open. Click Next, then specify the location of the partition that you want to enlarge the size of partition, the new partition size you want, and click Next.
  8. Partition will be directly tailored to the settings that have been previously determined.
Windows Vista-Managing Partitions Using Vista Disk Manager

Faster File Copying

Monday, July 6, 2009 · 0 komentar

One of the most annoying aspects about Vista is its very slow file copying from one computer to another. This issue has been hashed over and re-hashed many many times on the Internet and it was hoped that SP1 for Vista would finally solve this problem. Unfortunately, people who have already updated to SP1 have found that there is only a small incremental improvement in SP1 over pre-SP1 machines. I found what appears to be the solution on the Internet written in a blog by Mark Minassi. According to Mark, to problem seems to be with the autotuning feature of the new TCP stack and that even relatively new switches and routers may not like the autotuning feature. Try the following to see if transfer times improve: (reboot after resetting before trying out). In an “elevated” command window (must start “As Administrator”) type the following:

C:\> netsh interface tcp set global autotuninglevel=disabled
Prior to performing the above command, I tried a transfer of a 250 MB file from my computer to our server. The time to do the transfer was 2 min 39 seconds. After applying the above command, the transfer time dropped to 0 min 35 sec. Quite an improvement. Just to prove the point, I reentered the above command with “autotuninglevel=normal” and tried it again. My transfer time went back up to the 2 min 39 second time. So, it appears as if the above fix will work, at least for me. Try it and see if it works for you also.

Source : Vista Tips and Techniques by Greg Schwartz

Burning CD / DVD with Vista

Sunday, July 5, 2009 · 0 komentar

Besides having an interesting display Aero, Windows Vista will also have the ability to burn a CD or DVD, provided that your computer must have a CD-RW or DVD-RW devices. With this feature, you do not need to install the additional 3rd party of burning program. Actual procedure for doing burning in Vista is quite easy, so follow these steps:
  1. Prepare the project that you will burn.
  2. Enter the empty CD / DVD in your drive optic.
  3. Wait until the CD / DVD read by your device until Autoplay window appears. In the Autoplay menu, select the "Burn Files to Disc Using Windows" options.
  4. After that, the burn wizard will appear. At the beginning, you are prompted to provide your name on the disc. Then select the method of burning your disc if you're burning just to backup your computer, it is better to choose the Live File System option. But if the disc you used to distribute many files to another computer, select the Mastered. If you are done click Next.
  5. In the next window, you can start selecting the files or folders that will you burn. After selecting a file or folder, drag it to the empty area on the right. So the process of burning will begin immediately.
  6. Wait until the burning process is complete.
Now you have the disc that burning with windows vista. But burning feature in Windows Vista is still less than complete with 3rd party burning software. But for the standards uses, this features Windows Vista is still insufficient, another as if we want to burn another complex format file, like ISO or other .

Burning CD / DVD with Vista

Vista Check Boxes

Saturday, July 4, 2009 · 0 komentar

Vista has major improvements than XP, like visual effect and security system. Instead of trying to remember if you hold the CTRL or the SHIFT key down when you want to select a bunch of files in a row, you can set up your folder view to give you handy dandy little check boxes to make things easier.
  1. Get to the Folder Options Area.
  2. Open your Documents folder.
  3. Click the little arrow to the right of the word Organize.
  4. Select Folder and Search Options and the View tab.
  5. Scroll to the bottom of the screen and check the box next to the words "Use check boxes to select items."
  6. To make sure you will see check boxes whenever you are in Explorer poking around in your files, click the Apply to Folders button.
  7. Click OK.
From now on, as you move your cursor in any Windows Explorer window, a check box will appear next to each file. To select a file, check the box. You can uncheck your selections too, if you wish.

Vista Check Boxes

Hide Firefox Pop-Up

Friday, July 3, 2009 · 0 komentar

Mozilla offers a convenient tabbed browsing and navigation easier. But when we open a lot of tabs at once and then close the Firefox main window, will appear a pop-up confirmation. For those of you who feel offended by the pop-up window, you can change the Firefox registry. To follow the steps below:

  1. Open Firefox.
  2. In the address bar, type about: config.
  3. In the filter, type browser.tabs.warnOnClose.
  4. Highlight the option browser.tabs.warnOnClose, right click and select Toggle. So that was the true value will change to false.
Now when you open multiple tabs and close akan Mozilla Firefox, will not have a confirmation pop-up again.

Hide Firefox Pop-Up

Run Old Program Under Vista

Thursday, July 2, 2009 · 0 komentar

Windows Vista has the system higher than the previous generation of windows. Maybe you have to install a program long on windows vista, but when the program is run before a sudden stop working. Actual application can still run long under windows vista with the following tips:

  1. Right click on the program name, choose Properties.
  2. On Compatibility tab, click on "Run this program in compatibility mode for" and then in the drop down box, you can choose one of the older Windows versions to run in to.
  3. Then click OK to apply.
  4. Now try to launch the program again.
Note:
Tips may not work on all programs, but most programs can be run with tips above.

Run Old Program Under Vista

How To Remove Useless Device Drivers

· 0 komentar

When you install a device driver on a Windows XP, the operating system loads that driver each time the computer boots regardless of whether the device is present—unless you specifically uninstall the driver. This means that drivers from devices that you have long since removed from your system may be wasting valuable system resources.
Follow these steps to view and remove these unnecessary device drivers:
  1. Press Windows + Break to bring up the System Properties dialog box.
  2. Select the Advanced tab and click the Environment Variables button.
  3. Click the New button below the System Variables panel.
  4. In the New System Variable dialog box, type devmgr_show_nonpresent_devices in the Variable Name text box and 1 in the Variable Value text box.
  5. Click OK to return to the System Properties dialog box and then click OK again.
  6. Select the Hardware tab and click the Device Manager button.
  7. In Device Manager, go to View | Show Hidden Devices.
  8. Expand the various branches in the device tree and look for the washed out icons, which indicate unused device drivers.
  9. To remove an unused device driver, right-click the icon and select Uninstall.
How To Remove Useless Device Drivers

Fix Vista Error With IE7

Wednesday, July 1, 2009 · 0 komentar

This tip applies specifically to McAfee but may also come up with other programs. When you initiate a download and run Download Manager using IE7, the following error is displayed before Download Manager scans for installed applications:
An error (0X800c0019) occurred when the download manager tried to access the MC website
This may indicate a problem with the Certification Revocation List (CRL) related to the certificate. This information is used to validate the Secure Sockets Layer (SSL) certificate needed to create the SSL connection used by Download Manager. Issues with the CRL may occur if replication of CRL updates to the hosting servers is disrupted. When IE checks the SSL certificate against a CRL host server that is not up to date, the validation may fail. If the validation fails, IE7 will prevent the SSL connection from being created. This failure is part of the intended functionality of SSL certificates used in conjunction with a CRL.

The error occurs when the local IE7 CRL is out of date and McAfee is not listed in the CRL on the Certificate Authority server contacted.
You can fix this issue by disabling the option for IE to check for server Certificate revocation.
Follow these directions to do this:
  1. Click on Start, All Programs, and then Internet Explorer
  2. Click Tools, Internet Options.
  3. Select the Advanced tab.
  4. Navigate to the security section and DESELECT the “Check for Server Certification Revocation”
  5. Click Apply to save the changes.
You should now be able to download your update or program. Remember, to be on the safe side, after downloading successfully, you should reverse the above by ENABLING the “Check for Server Certification Revocation”.

How To Make Special Character

Tuesday, June 30, 2009 · 0 komentar

Have you ever wanted to create your own font or maybe just a special character—for example, a character showing your initials for approving documents with your “signature”? You can easily create your own characters using a hidden Windows XP tool called the Private Character Editor. Here’s how:

  1. Press Windows + R to open the Run dialog box.
  2. Type eudcedit in the Open text box and click OK.
  3. When the Private Character Editor launches, you’ll see the Select Code dialog box. Click OK.
  4. A user interface that looks and works very much like Paint will appear. Here, you can use standard tools to create your characters.
  5. When you finish, select the Save Character command on the Edit menu.

Once you save your new character, you can access it using the Character Map tool. Here’s how:

  1. Press Windows + R to open the Run dialog box.
  2. Type charmap in the Open text box and click OK.
  3. When the Character Map appears, select the Font drop-down list and select All Fonts (Private Characters).
  4. Select your character, click the Select button, and then click the Copy button.
You can now paste your font character into any document that you want.


Fix File Security Warning

Monday, June 29, 2009 · 0 komentar

If you are on a network (most likely at work) and you click on a file somewhere on the network, perhaps a file server, and you get a popup box that says: Open File – Security Warning and the file won’t open, you need to follow this procedure:
  1. Click "Start", then in the "Run" box, type: inetcpl.cpl .
  2. Click the "Security" tab at the top .
  3. Click "Trusted Sites", then click "Sites".
  4. In the top box, type: https://xxx.xxx.xxx.xxx (enter the IP address of your server or other computer where the file is located). NOTE : the "s" at the end of "https:".
  5. Click "Add" .
  6. Uncheck "Require server verification (https: ) for all sites in this zone".
  7. Click "Close".
  8. Click on "Local Intranet" .
  9. Click "Sites" .
  10. Uncheck"Automatically detect intranet network".
  11. Make sure all 3 items below are now checked.
  12. Click OK and then click OK again.

Solve Locate Link Browser Pop-Up

· 0 komentar

If you found a pop-up box with words like “LOCATE LINK BROWSER” when you click on a link in an email, you are probably using Firefox as your default browser and you have probably just had an update to Firefox. When the update is installed, it changes registry setting which you will need to manually change per the following. After making the following changes, you will no longer get the Locate Link Browser message until the next time that Firefox is updated. Then, you will have to repeat the following Registry Edit.
  1. Go to Start then Run then type regedit and click OK.Use the directory tree hierarchy to navigate to HKEY_CLASSES_ROOT\HTTP\shell\open\ddeexec”.
  2. Delete the “ddeexec” registry key in it’s entirety
  3. Repeat for “HKEY_CLASSES_ROOT\HTTPS\shell\open\ddeexec”.
  4. Repeat for “HKEY_CLASSES_ROOT\Firefox\URL\shell\open\ddeexec”.
  5. Repeat for “HKEY_CLASSES_ROOT\FirefoxHTML\shell\open\ddeexec”.

Fix Wireless Connection

Sunday, June 28, 2009 · 0 komentar

Sometimes, we want to surf web by wireless function on laptop or netbooks. All configure properly, but why can't find any networks. To fix that, try to use this tips:
  1. Make sure your wireless device is turned on.
  2. Try to disable your firewall.
  3. Check the installed driver for your wireless device.
  4. Make sure Wireless Zero Configuration Services is enable.
To check Wireless Zero Configuration Services, follow this steps:
  1. Go to Run then type services.msc
  2. Windows Services will show. In the Services Name find Wireless Zero Configuration.
  3. Double Click on Wireless Zero Configuration.
  4. On Startup Type choose Automatic option and click Start on Services Status.
Fix Wireless Connection

Prevent a Shutdown Tips

· 0 komentar

With these tips, the computer will not shutdown by access start menu then select Turn Off Computer option. Sometimes it is necessary to avoid someone to turn off our computers. For that do the following:
  1. Launch the Registry Editor (Run->Regedit).
  2. Go to HKEY_CURRENT_USER \ SOFTWARE \ Microsoft \ Windows \ CurrentVersion \ Policies \ Explorer.
  3. Right-click the Explorer subkey and select New | DWORD Value.
  4. NoClose the key name and press Enter twice.
  5. Type 1 in the Value Data text box and click OK.
  6. Restart Computer.
Now, to be able to turn off the computer, just access Task Manager by pressing Ctrl + Alt + Delete, then pull down the Shut Down menu and select the Turn Off option.

Prevent a Shutdown Tips

Changing Font Display in Windows Explorer

Saturday, June 27, 2009 · 0 komentar

As we know, Windows Explorer and My Computer display the same font that Windows XP uses for icon titles on your desktop, that is Tahoma 8pt. If you want to change the font or font size used in Windows Explorer, follow these steps:

  1. Right-click on the desktop and select Properties to enter the menu on the Display Properties settings.
  2. Select the Appearance tab.
  3. Click the Advanced button.
  4. Select Icon from the drop-down menu item.
  5. Select the font you like dar the drop-down menu and the font size font.
  6. Click OK to close the Advanced Appearance window and the Display Properties.

Slow Motion Animation

· 0 komentar

With this tips, you can enable “Slow Motion” animation on windows Vista. This tips will work if Windows Aero glass theme activated. To use it, holding the “shift” key while minimizing , maximizing , closing a window.


First, open notepad then copy paste code below to notepad

Windows Registry Editor Version 5.00

[HKEY_CURRENT_USER\Software\Microsoft\Windows\DWM]
"Animations"=dword:00000001
"AnimationsShiftKey"=dword:00000001


Or you can download the .reg file here

Slow Motion Animation

Remove Security Center Icon

Sunday, May 10, 2009 · 0 komentar

Windows Vista comes with many features, including Windows Security Center. This feature serves as the central control of the PC security against various attacks that may attack the PC such as viruses, spyware, worms and other malware.
Proof of the existence of these features will be felt immediately after the installation windows for first time. A shield-shaped icon appears in the notification area for member-level security information on the PC.
If the condition is considered less secure PC, the icon will be quite choosy with regard to the security of users PC. Therefore, for those of you who want to hide the Security Center icon, follow the steps below:

  1. Open the Control Panel and select Security Center.
  2. On Window Security Center window, click Change the Way Security Center alerts me that placed on left panel.
  3. In the dialog box that appears with the question Do you want to be notified of security issues? Select Don't notify me and don't display the icon.
  4. Close the windows Security Center window.


Shutdown and Reboot Shortcuts

Saturday, May 9, 2009 · 0 komentar

First, create a shortcut on your desktop by right-clicking on the desktop, choosing New, and then choosing Shortcut. The Create Shortcut Wizard appears. In the box asking for the location of the shortcut, type shutdown. After you create the shortcut, double-clicking on it will shut down your PC.

But you can do much more with a shutdown shortcut than merely shut down your PC. You can add any combination of several switches to do extra duty, like this:

shutdown -r -t 01 -c "Rebooting your PC"

Double-clicking on that shortcut will reboot your PC after a one-second delay and display the message "Rebooting your PC." The shutdown command includes a variety of switches you can use to customize it.

Use this technique to create two shutdown shortcuts on your desktop—one for turning off my PC, and one for rebooting. Here are the uses:

shutdown -s -t 03 -c "Bye Bye.."
shutdown -r -t 03 -c "Ill be back.."


Parameters :

-s
Shuts down the PC.

-l
Logs off the current user.

-t nn
Indicates the duration of delay, in seconds, before performing the action.

-c "messagetext"

Displays a message in the System Shutdown window. A maximum of 127 characters can be used. The message must be enclosed in quotation marks.

-f
Forces any running applications to shut down.

-r
Reboots the PC.


Computer Maintenance

Thursday, May 7, 2009 · 0 komentar

Your computer and your car have something in common: they both need regular maintenance. No, you don't need to change your computer's oil. But you should be updating your software, keeping your antivirus subscription up to date, and checking for spyware. Read on to learn what you can do to help improve your computer's security. Here are some basics maintenance tasks you can do today to start improving your computer's security. Be sure you make these part of your ongoing maintenance as well.

  1. Sign up for software update e-mail notices. Many software companies will send you e-mail whenever a software update is available. This is particularly important for your operating system, your antivirus program, and your firewall.
  2. Register your software. If you still have registration forms for existing software, send them in. And be sure to register new software in the future. This is another way for the software manufacturer to alert you when new updates are available.
  3. Install software updates immediately. When you get an update notice, download the update immediately and install it. (Remember, downloading and installing are two separate tasks.

A few simple steps will help you keep your files safe and clean

  1. Update your software
  2. Backup your files
  3. Use antivirus software and keep it updated
  4. Change your passwords


Developing ongoing maintenance practices

Now that you've done some ground work, it's time to start moving into longer term maintenance tasks. These are all tasks that you should do today (or as soon as possible) to get started. But for best results, make these a part of a regular maintenance schedule. We recommend setting aside time each week to help keep your computer secure.

  1. Back up your files. Backing up your files simply means creating a copy of your computer files that you can use in the event the originals are lost. (Accidents can happen.) To learn more read our tips for backing up information.
  2. Scan your files with up to date antivirus software. Use your antivirus scan tool regularly to search for potential computer viruses and worms. Also, check your antivirus program's user manual to see if you can schedule an automatic scan of your computer. To learn more, read our tips for reducing your virus risk.
  3. Change your passwords. Using the same password increases the odds that someone else will discover it. Change all of your passwords regularly (we recommend monthly) to reduce your risk. Also, choose your passwords carefully. To learn more, read our tips for creating stronger passwords.

Making a schedule

One of the best ways to help protect your computer is to perform maintenance regularly. To help you keep track, we suggest making a regular "appointment" with your computer. Treat it like you would any other appointment. Record it in your datebook or online calendar, and if you cannot make it, reschedule. Remember, you are not only helping to improve your computer, you are also helping to protect your personal information.


Auto End Tasks to Enable a Proper Shutdown

Wednesday, May 6, 2009 · 0 komentar

This tips make automatically ends tasks and timeouts that prevent programs from shutting down and clears the Paging File on Exit.

1. Copy the following text below into notepad.

Windows Registry Editor Version 5.00

[HKEY_LOCAL_MACHINE\SYSTEM\CurrentControlSet\Control\Session Manager\Memory Management]
"ClearPageFileAtShutdown"=dword:00000001

[HKEY_USERS\.DEFAULT\Control Panel\Desktop]
"AutoEndTasks"="1"

[HKEY_LOCAL_MACHINE\SYSTEM\CurrentControlSet\Control]
"WaitToKillServiceTimeout"="1000"


2. Save the file as shutdown.reg
3. Double click the file to import into your registry.

NOTE: If your anti-virus software warns you of a "malicious" script, this is normal if you have "Script Safe" or similar technology enabled.


Vista System Health Report

Tuesday, May 5, 2009 · 0 komentar

As we know, the windows vista features the System Health Report is able to produce a report on the condition of the PC. Reports provided based on information provided Reability and Performance Monitor. With this feature, we can quickly obtain information quickly on the area system which has the potential to cause issues. To use this feature, follow the steps below:

  1. Open the Control Panel.
  2. Select System and Maintenance menu.
  3. Select Performance Information and Tools.
  4. In the task list which is on the left, select Advanced Tools.
  5. The diagnostic results will be displayed last. This process takes several minutes. Results of the diagnosis will be displayed in the Reliability and Performance Monitor window.
Reliability and Performance Monitor


TCPOptimizer

Monday, May 4, 2009 · 0 komentar

Internet is the place where all information can be found easily and quickly, but what if our Internet connection is not so fast, how much is done to speed up the connection manually or automatically. One alternative that can be used is TCPOptimizer. Follow the steps below to use:

  1. Download TCPOptimizer here.
  2. Run TCPOptimizer.
  3. Find the option Current Settings, Optimal Settings and Custom Settings.
  4. Select the Optimal Settings.
  5. Click Apply Changes.


Better Sound on Vista

· 0 komentar

In Windows XP, any regulation made standard. There are no features to optimize the sound quality like bass, surround or equalition. Like others, if we install a sound card with a variety of additional applications to be able to produce a better sound from the onboard soundcard. For those who still use the onboard soundcard, can still vote, but by using Windows Vista, because on Windows Vista is equipped with the capability of voice. Do the following tips:
 
  1. Go to the Control Panel, select the Sound menu.
  2. In the Sound window, select the Playback tab.
  3. Select the speaker icon and click Properties.
  4. Properties window appears, click the tab Enchacements and see the box that contain options Bass Boost, Virtual Surround, Room Correction, and Loudness Equalization. Check the options above and click Settings to configure the options selected above.
  5. Save changes by clicking the OK button
vista sound properties

Computer Tips


Enlarge Cursor Size Trick

Sunday, May 3, 2009 · 0 komentar

Word processing applications typically have a vertical blinking cursor that allows you to show the position of the text that will appear next. So if you want more easier to find that cursor, and with a little trick, you can enlarge the size of the cursor is. Follow the steps below:

  1. Open Start-> Control Panel.
  2. Type "optimize visual display" in the search box in the Control Panel.
  3. After that, the shortcut will show search results, click the shortcut.
  4. On the line "Set the tickness of the blinking cursor", change the value of a combo box with a greater value.
  5. Click the save button to save the changes.


Trick To Restore Missing Document in MyComputer

Saturday, May 2, 2009 · 0 komentar

Here are tips to restore the missing documents folder in My Computer :

  1. Open regedit
  2. Go: HKEY_LOCAL_MACHINE / Software / Microsoft / Windows / CurrentVersion / Explorer / DocFolderPaths
  3. Select Edit menu> New> String Value and name in accordance with the username that is used in Windows (for example: Chippers)
  4. Double click on the value and enter the path where you reside Documents (ex D: \ Documents)
DocFolderPaths Trick


More Shortcut Menu On Recycle Bin

Friday, May 1, 2009 · 0 komentar

Usually recycle bin menu only has restore, cut, delete and properties menus. To add more menu, follow this steps :

  1. Open regedit
  2. Find key : HKEY_CLASSES_ROOT/CLSID{645FF040-5081-101B-9F08- 00AA002F954E}/ShellFolder
  3. Double click Attributes and chane number in Value Data with following numbers:
  • 0000 50 01 00 20 > Rename
  • 0000 60 01 00 20 > Delete
  • 0000 70 01 00 20 > Rename & Delete
  • 0000 41 01 00 20 > Copy
  • 0000 42 01 00 20 > Cut
  • 0000 43 01 00 20 > Copy & Cut
  • 0000 44 01 00 20 > Paste
  • 0000 45 01 00 20 > Copy & Paste
  • 0000 46 01 00 20 > Cut & Paste
  • 0000 47 01 00 20 > Cut, Copy & Paste


Archives

Followers

Site Sponsors

Add to Technorati Favorites
Click Here to Advertise On My Blog